This document was created to capture the processes associated with importing leads into Sierra Interactive. This process is most commonly used when a client is new to Sierra Interactive and needs to migrate from another platform.
Process
Export from Prior Platform
If you still have access to your prior platform, export the database after adding the following tags to leads based on status. This will most likely require you to create these tags in their prior platform before applying the tag to each group of leads.
Buyer Tags
Buyer Prime = Anyone you are working closely with
Buyer Pending = Anyone that you are currently transacting with
Buyer Closed = Past clients
Buyer Archived = Sphere of influence, friends & family, vendors, agents
Buyer Qualify = Everyone else gets tagged with qualify
Seller Tags
Seller Prime = Anyone you are working closely with
Buyer Pending = Anyone that you are currently transacting with
Seller Closed = Past clients
Seller Archived = Sphere of influence, friends & family, vendors, lenders, agents
Seller Qualify = Everyone else gets tagged with qualify
Please note: Vendors and Lenders also get a Remove from GGMS tag to keep them away from any automation, action plans, and filters.
Format .CSV File
If you are able to tag, export, and/or provide a copy of your database in .csv format, you need to format the document so that it is optimized for Sierra Interactive’s lead import tool.
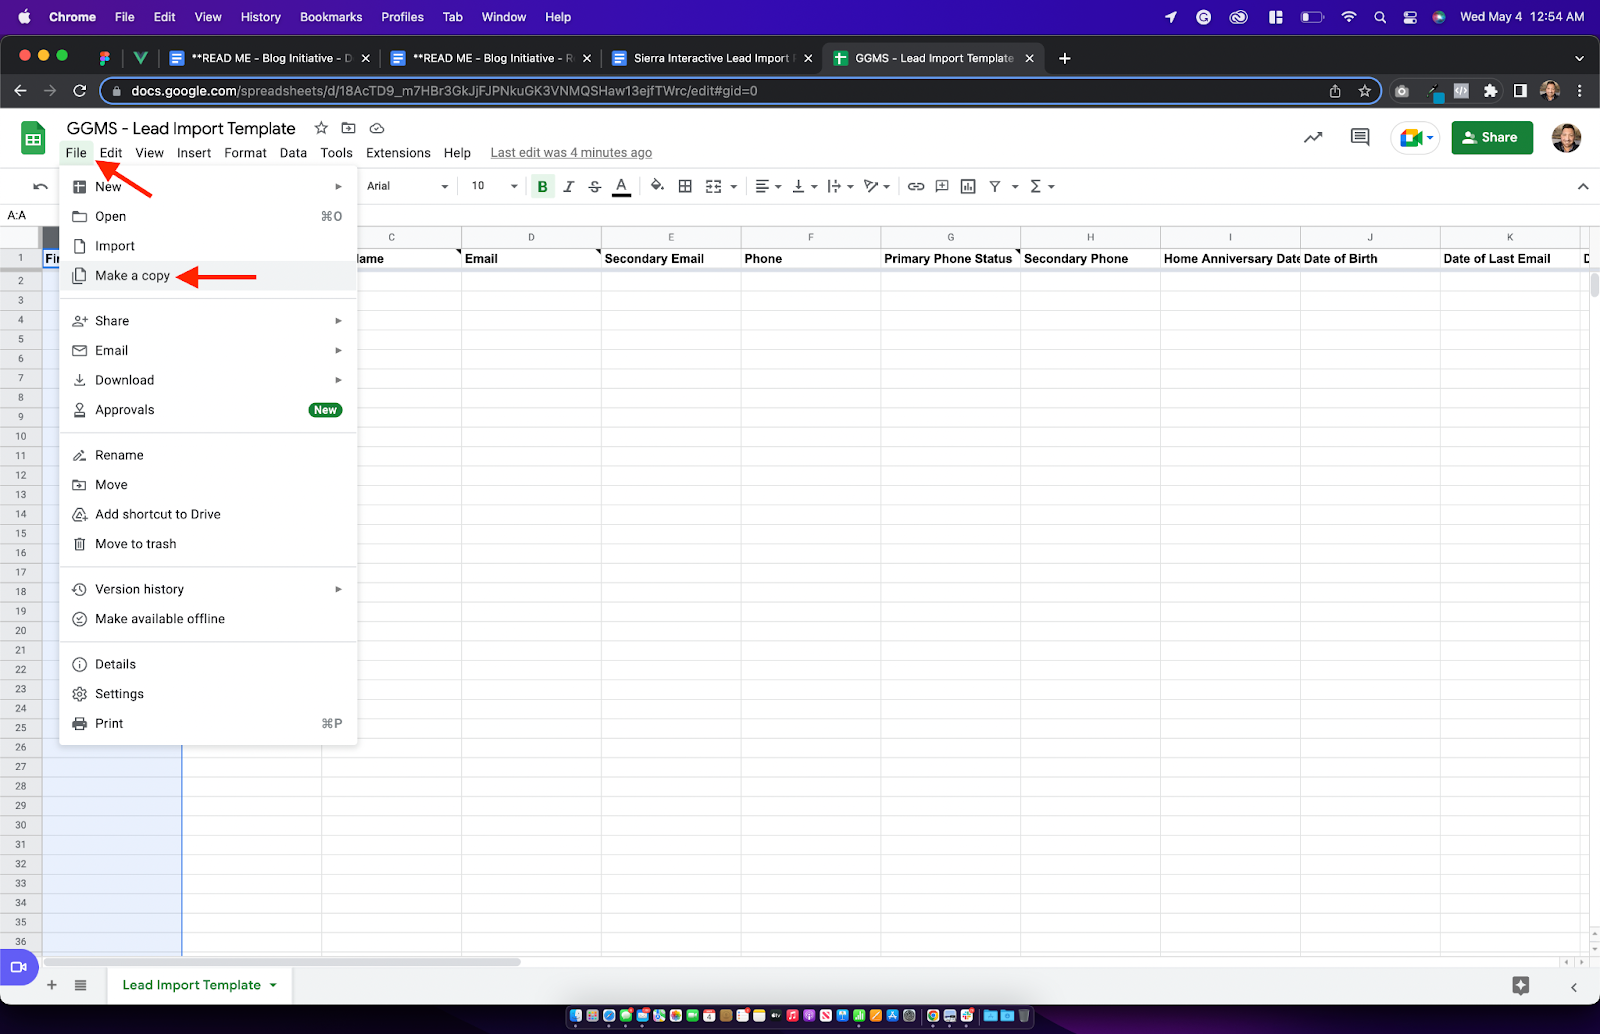
Use this GGMS - Lead Import Template as a guide for consolidating their data into the proper columns to make the mapping process easier and most compatible with Sierra Interactive’s mappable fields.
Start by making a copy of the document. File > Make a copy. Replace Copy of with Client Name - GGMS - Lead Import Template and update the Folder if necessary.

Copy and paste data from the client .csv export into the correct columns inside the template.
Header row cells with a black corner in the top right mean that if you hover over the cell it contains detailed instructions, typically around proper formatting.

Once ready, click File, Download, and generate a Comma Separated Value (.csv) version of the formatted data.

Import into Sierra Interactive
After the .csv file has been formatted, you can import the leads into Sierra Interactive. Make sure that any automations are deactivated during the import process to avoid any automations from executing before organizing the database.
Under the Gear Icon, select Lead Import Wizard.

Scroll to the bottom of the Acceptable Use Policy, mark the Checkbox and then click Upload a CSV File. Locate the .csv file on your computer to continue.

After selecting the .csv file, the following screen will appear. Depending on the size of the file, you might end up with this loading screen for a few moments.

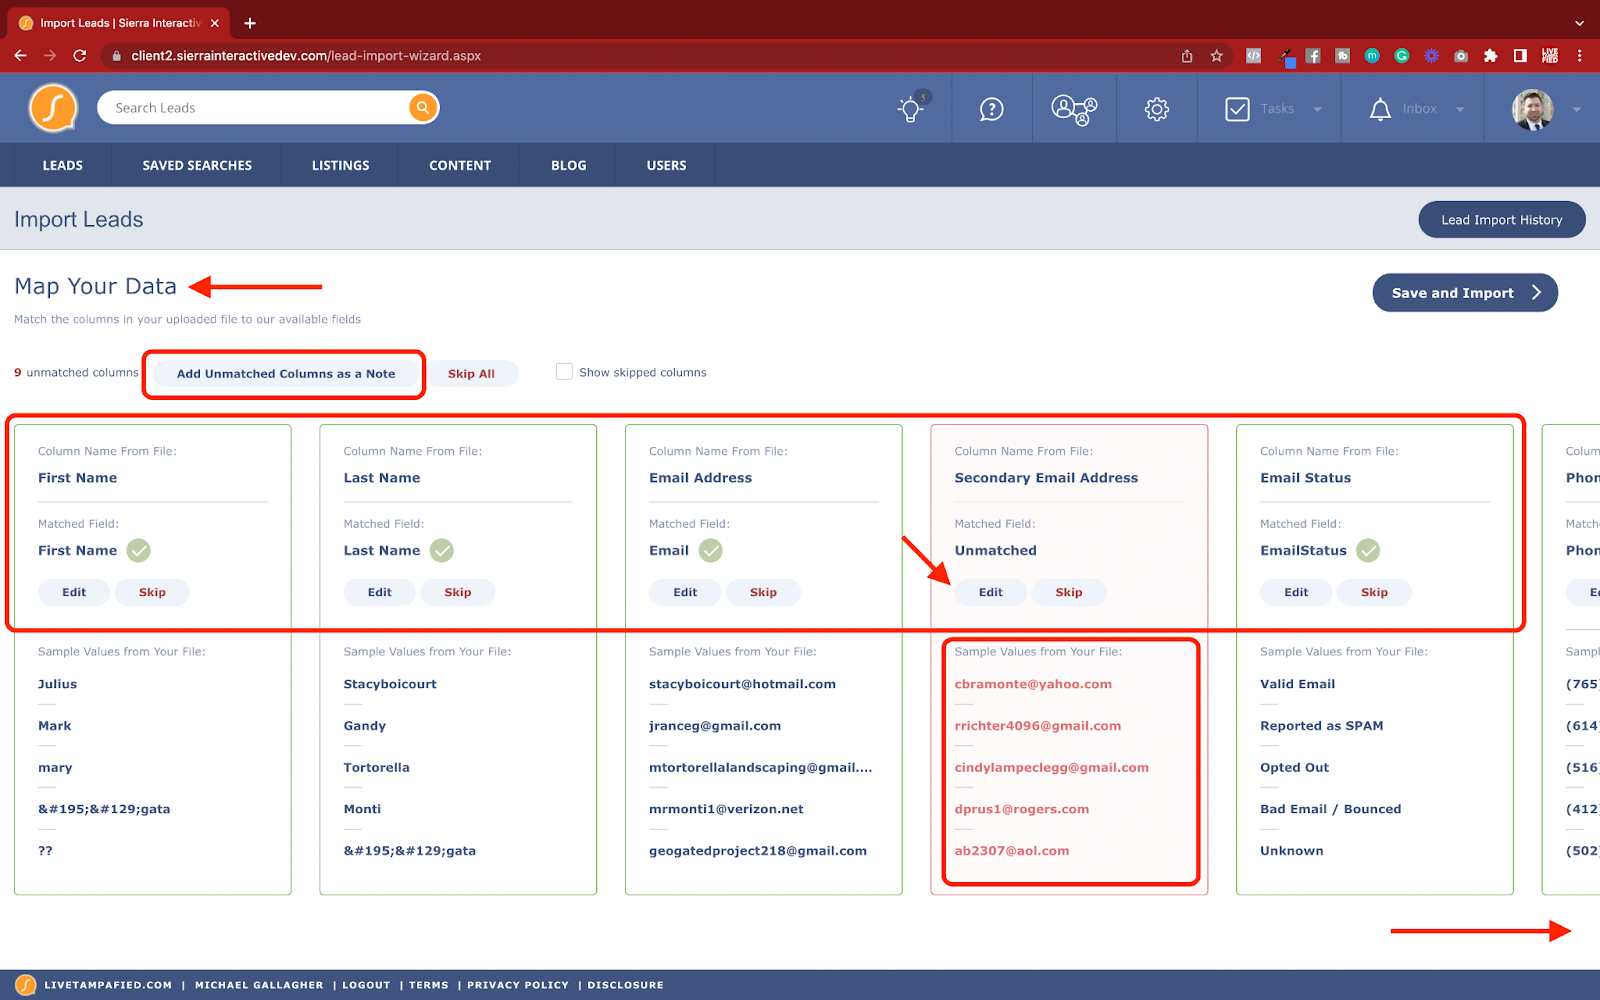
Following the file processing, you will be on the Map Your Data screen. From here, you can see the Column Name From File along with fields that were automatically mapped with a Green Checkmark.
If there are columns in Red, you can use the data preview as a way to identify the best match. Use the Edit button to match or rematch a field.
If there is nothing that matches, you can also use the Add Unmatched Columns as a Note button. Scroll right to see additional columns and make sure that all items are matched appropriately.
Once you are happy with the mapping, press Save and Import to being the upload process.
Database Alignment
Now that the leads are successfully imported into the client's CRM, you’ll need to align the database. Essentially, we are going to use the tags that we had the client add to their leads prior to exporting from the prior platform and match them up with the statuses inside of Sierra Interactive.
You will have to complete the following process for each group of leads that are tagged.
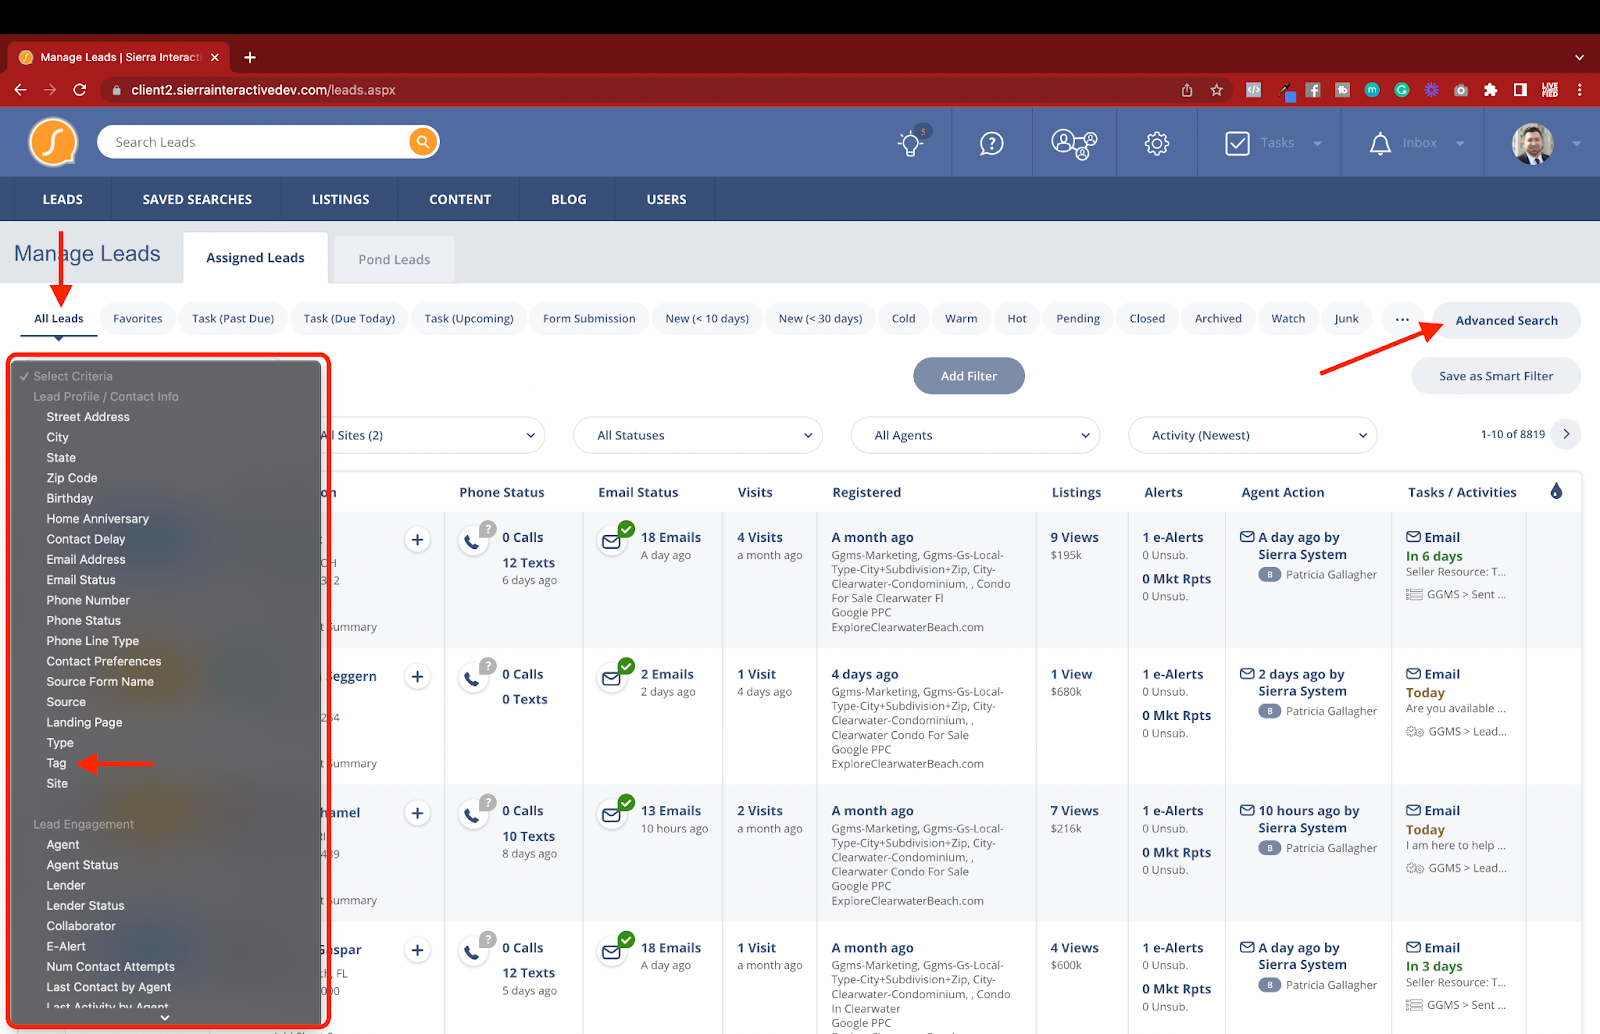
Locate Leads
Start from Leads, Leads Dashboard to open the Manage Leads screen. First, make sure that you are on the All Leads filter to avoid missing leads. Then, use the Advanced Search button on the far right to reveal the Select Criteria dropdown menu. Choose Tag as the filter type.

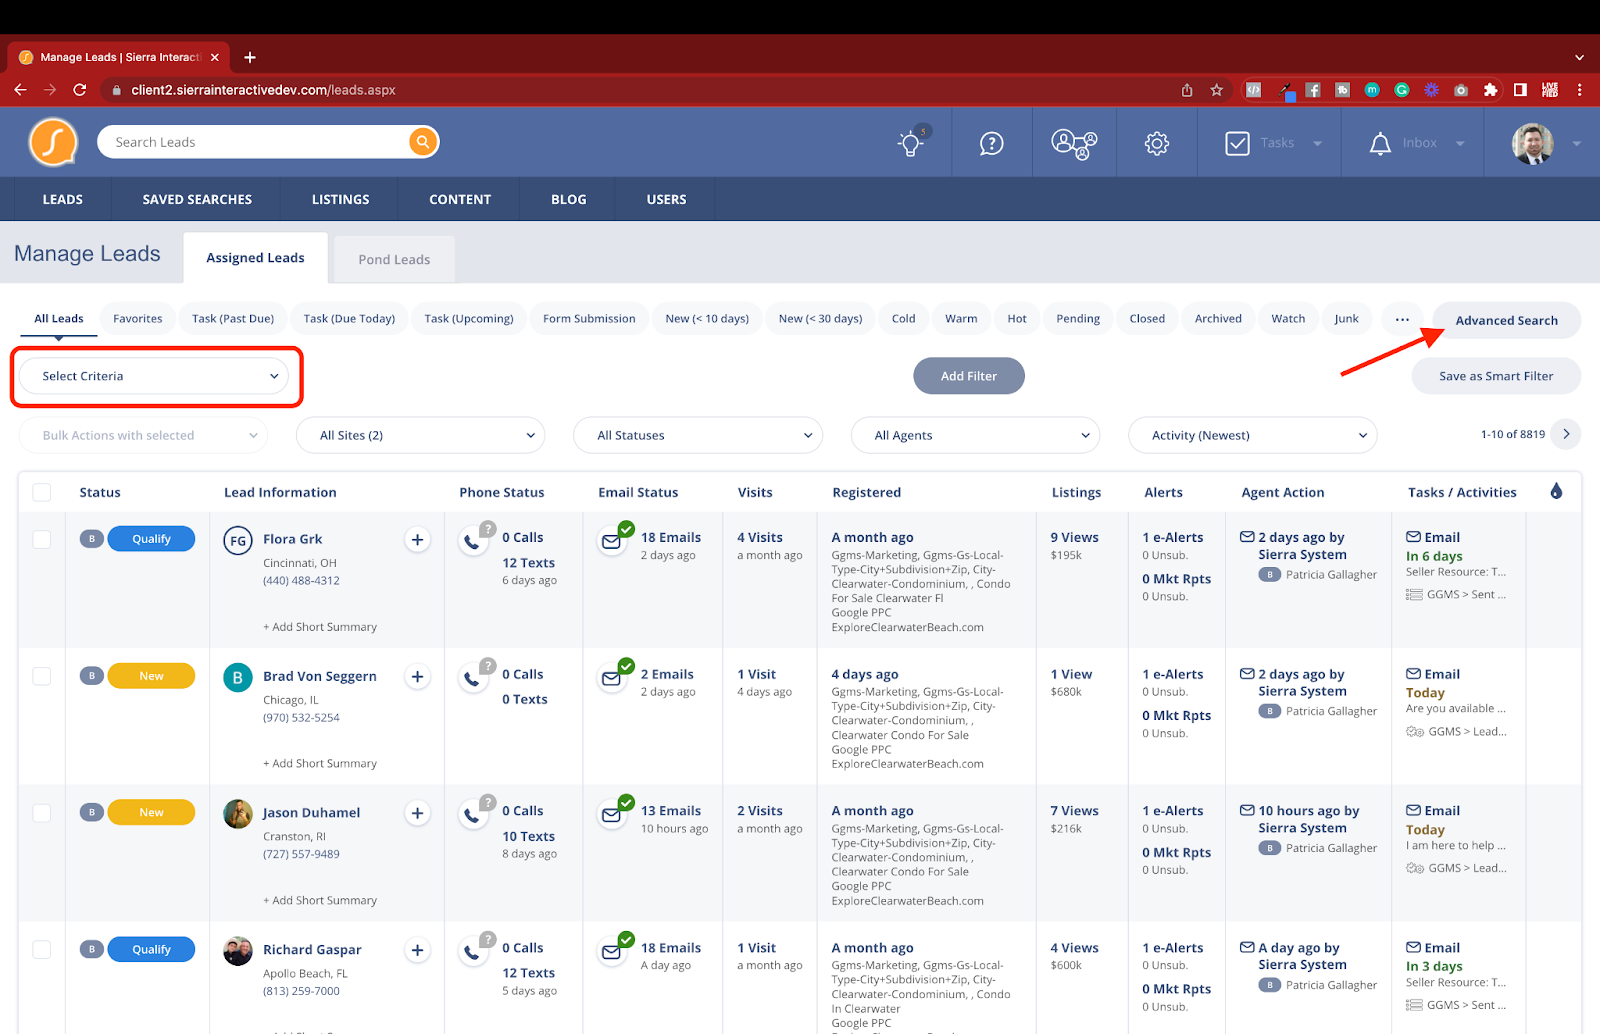
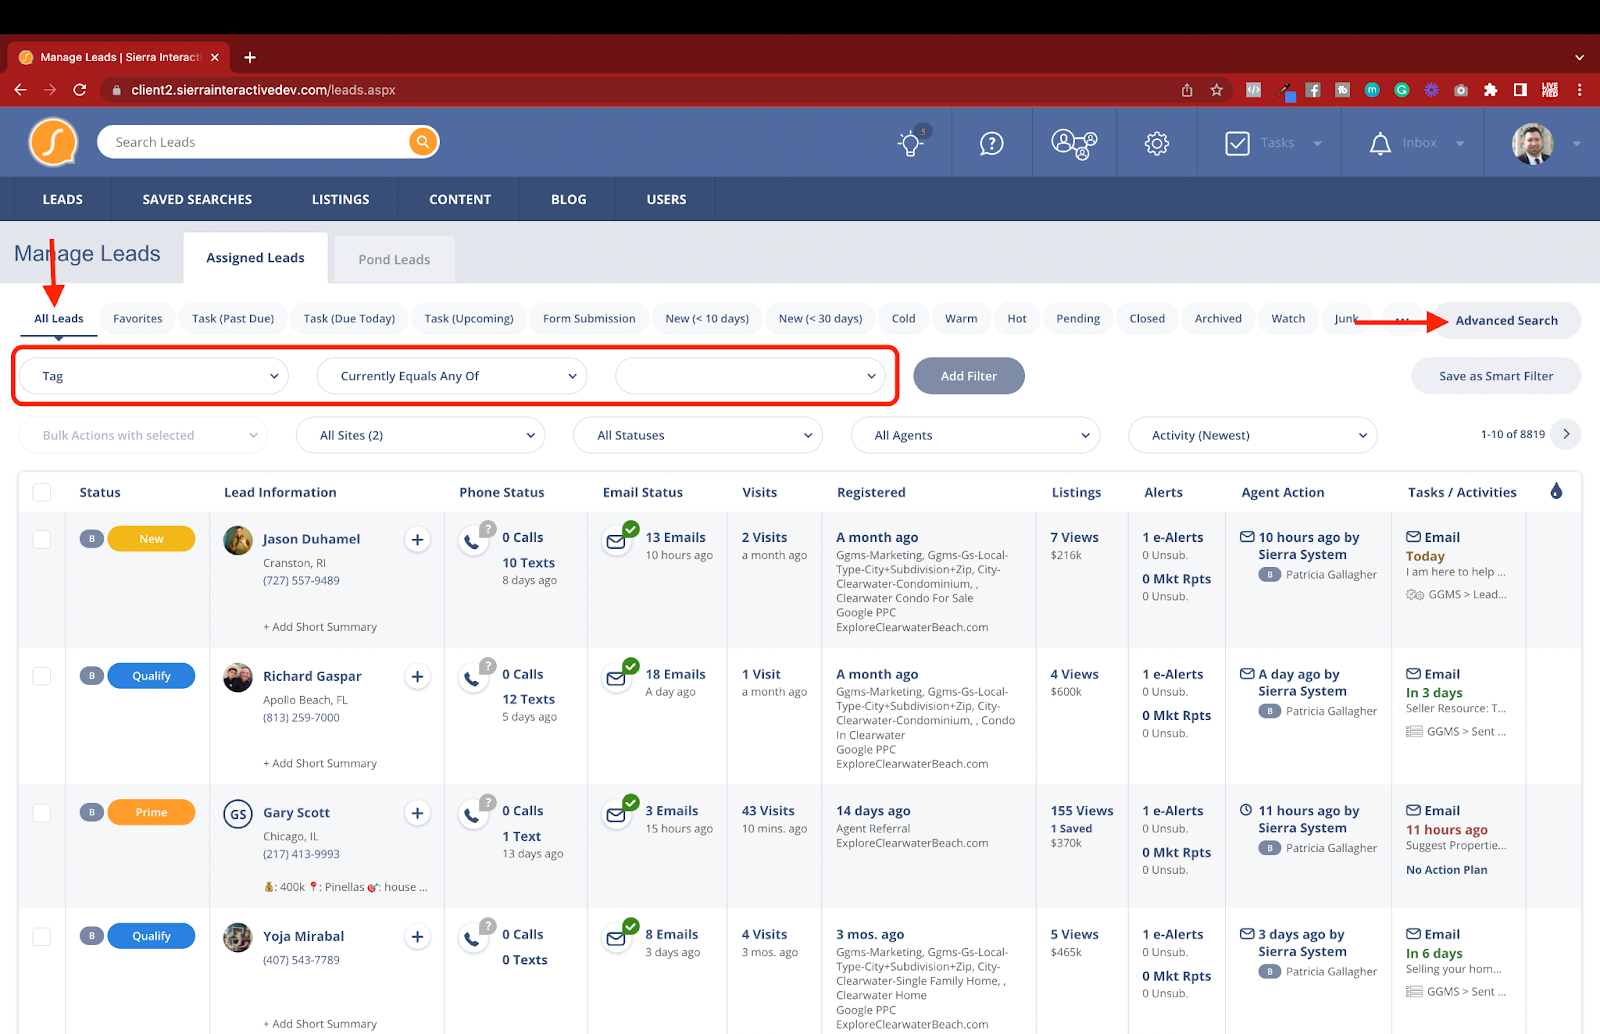
Once you select Tag as the filter, choose Currently Equals any Of and then enter the tag name; such as Qualify. This will reveal all leads in the system with the associated tag.

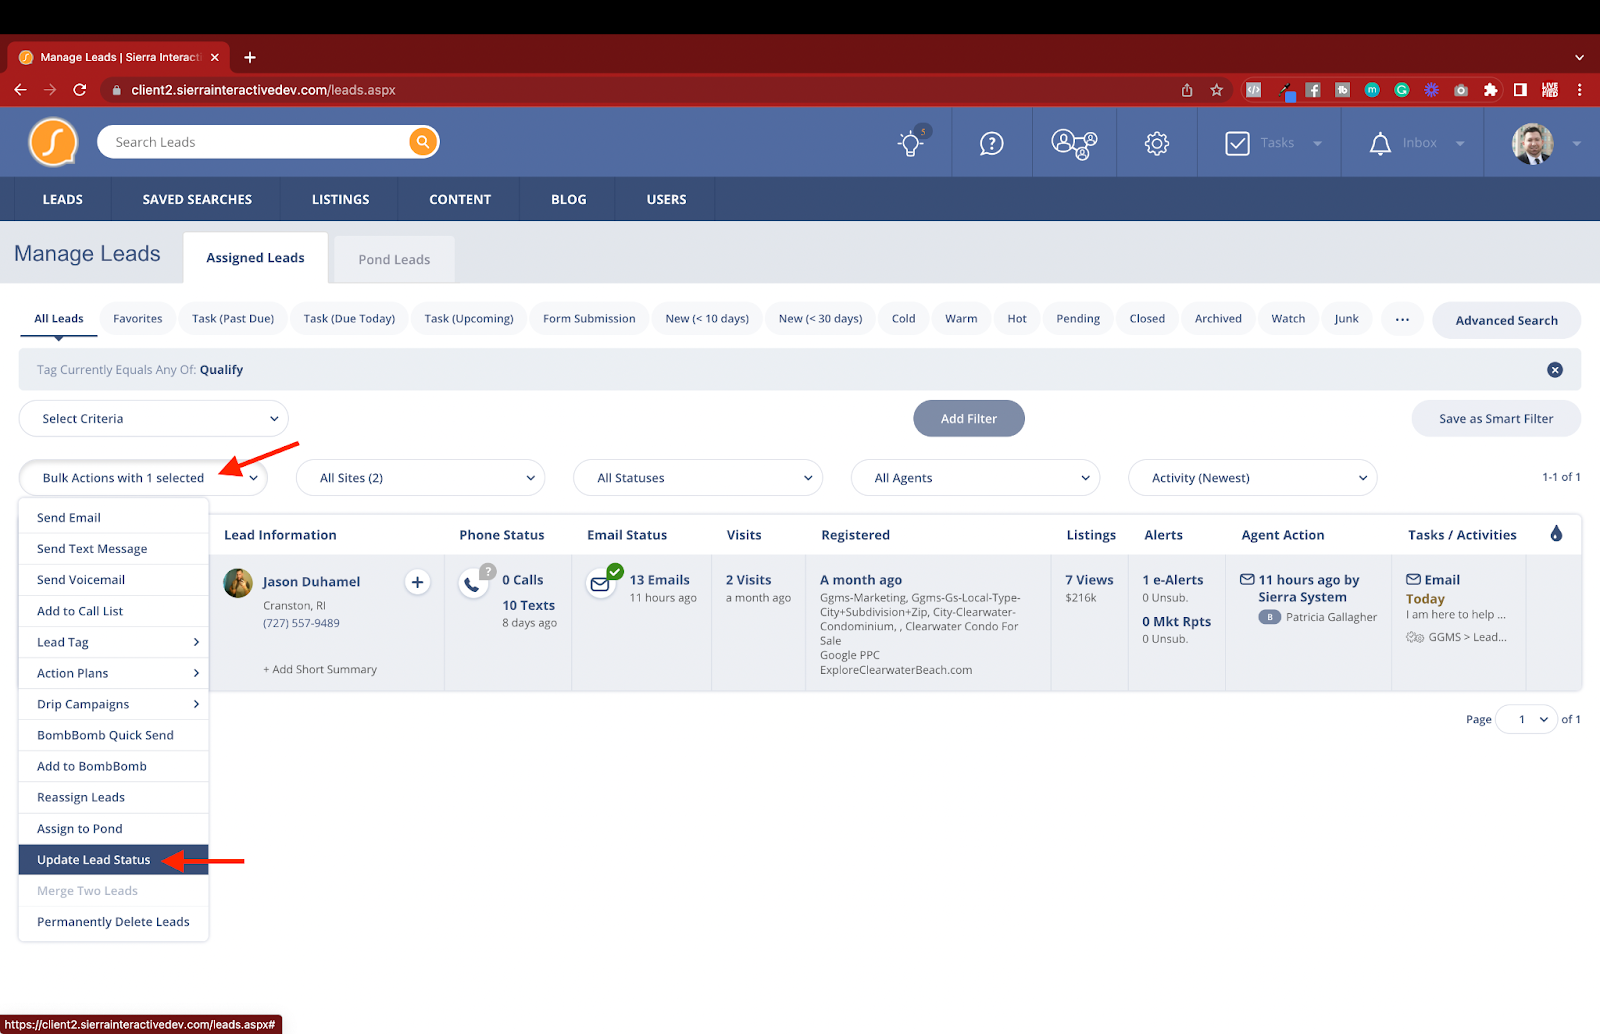
Update Lead Status
Use the Checkbox to select all leads on the page, use the select all matching which appears if more records than what is shown on the page exist.
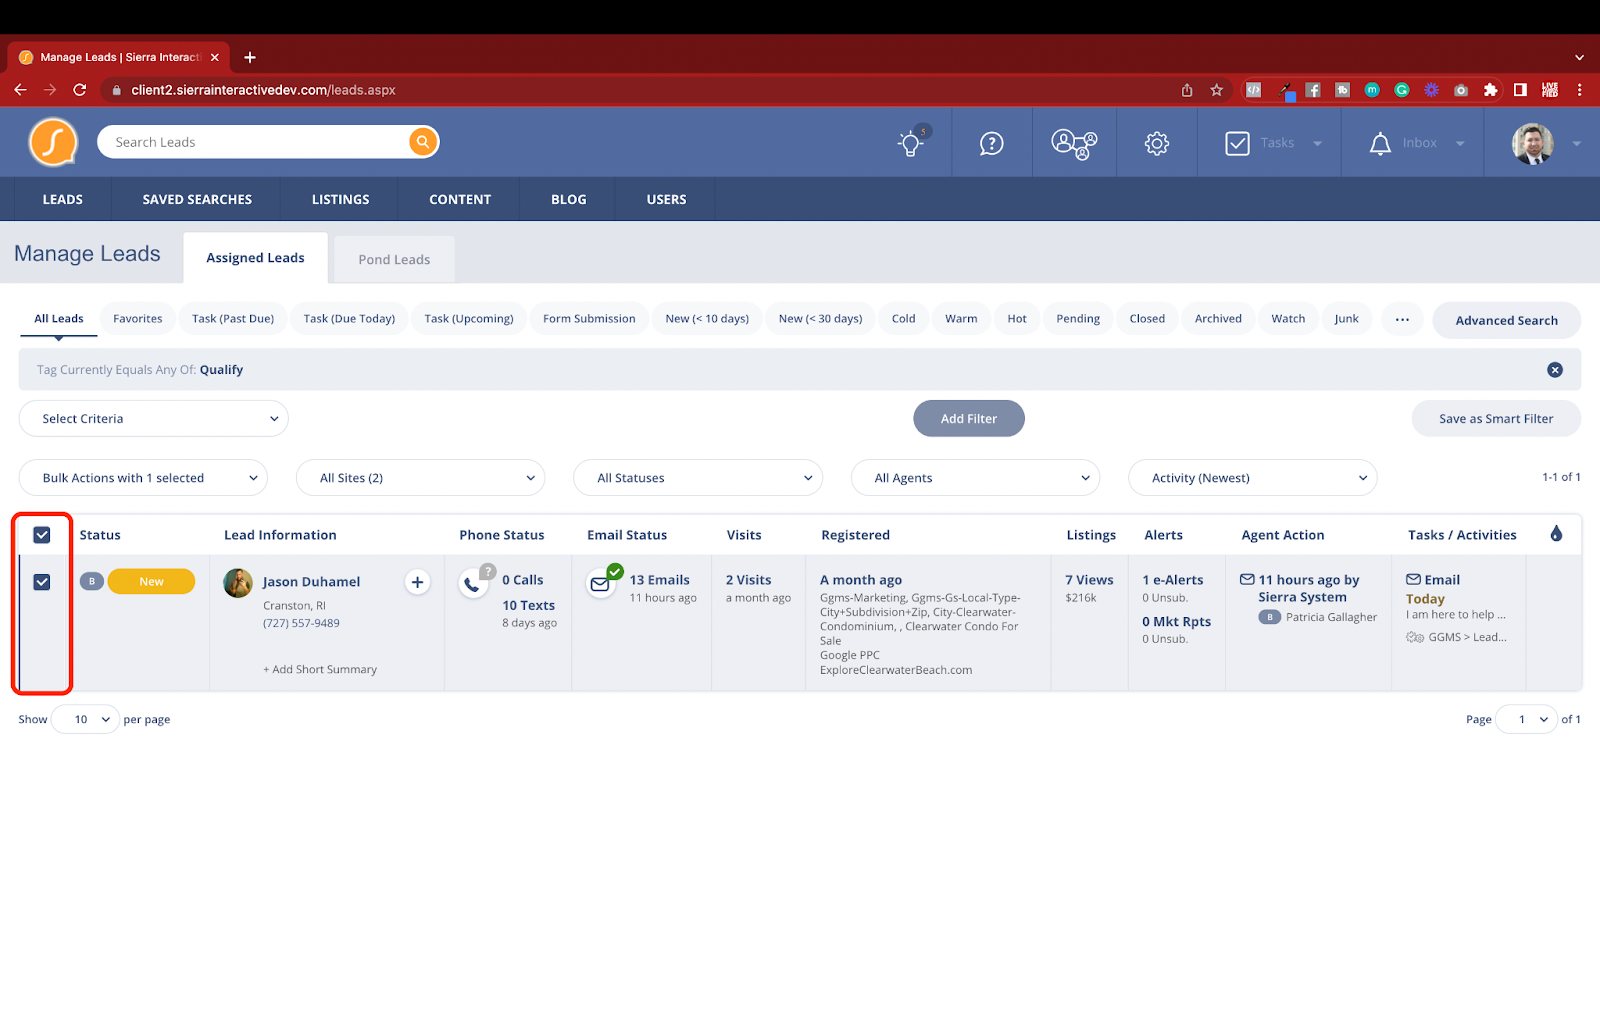
Then, use the Bulk Actions with X Selected dropdown to reveal the options. Choose Update Lead Status to open the pop-up. From here, you can select a Buyer’s Agent Status and/or Listing Agent Status. Match this up with the tag you just used to identify the group of leads.